Showing posts with label Unit 1 Digital. Show all posts

Tuesday, 8 October 2013

Textures and Layering

One of the many useful features of Photoshop is combining texture images within another image to give a completely different 'feel' to the final image.  This can have the effect of adding interest and variation to an otherwise 'flat' image. All images need to be set at the same resolution for the effect to be predictable, however images can be re-sized during the procedure.

Original Image
 
I have taken a high key image of stones in the studio that hopefully by adding textures as layers in Photoshop will increase interest and variation.


This image is of cream painted brick and I intend to use it as one of my  texture layers.  As this is taken in landscape orientation, I will need to stretch the image using the free transform function.  The brick will add an overall texture to the image.

I am also going to use my image of fallen Autumn leaves which is also in landscape orientation and will need the same adjustment as the previous texture image. The leaves will add variation and vague shapes to the image.

This first screen shot is that of the stones opened in Photoshop ready to be merged with textures.  I have used a JPEG file that is automatically opened in the layers palette, ready to add the texture layers.


I have chosen a images of cream stone and one of autumn leaves to add the texture layers to my image.  These images are opened by directly dragging the files into Photoshop on top of the original image of the stones.  Separate layers for each image will then be accessible in the layers palette. The texture layers are re-sized by using the free transform option once the images are imported.


In order to blend the images together a 'soft light' layer is chosen which adds a soft diffusion to the texture layers allowing the original image to show through.  A 'layer mask' is then added to the texture layers in order to selectively paint upon them which allows me to reveal the stones minus the texture overlays.  Another layer has also been added in order to use the gradient tool which has allowed me to darken the outside areas of the image.


 The Final Image


My Evaluation
My conclusion of this feature in Photoshop is that I found it both interesting to use as well as understanding it's worth in digital manipulation. By using the layers constructively, a great amount of detail and variation can be added to an image without taking away it's original structure.

Further texture blending in Photoshop

The original image

The Photoshop manipulated image


Tuesday, 1 October 2013

HDR in Photoshop - Tues 1/10/13


In class today we have discussed digital RAW images and it's uses/advantages.  Digital RAW images are the equivalent to negatives in film photography and consequently can be used to alter our images in greater depth than JPEG's.
In order to create a HDR image in Photoshop, I have begun by altering the exposure of one of my own images that I felt would benefit from altering the foreground and sky exposures.  Using Photoshop to merge images is a much subtler way of creating HDR images than specific programmes such as Photomatix and allows us to maintain a greater degree of control over the final image.
We also discussed the 'Dodge and Burn' tools in Photoshop and how they can be used to selectively lighten and darken areas of an image.  'Dodge and Burn' are also referred to as digital darkroom tools as they don't actually manipulate an image but are very useful for changing specific areas of exposure.

This is the original image and I feel that the area under what remains of the old market and the foreground is too dark but I don't wish to increase the exposure in the sky area.

This is the image increased to +2.60 which effectively lightens the area under the canopy but also blows the sky out.

 
This image is a screenshot of the RAW file opened in Photoshop ready to alter the exposure

Saving the altered RAW file as a JPEG.  This was repeated twice, once for the mid tones and another for the highlights.

Both of the JPEG's are opened in Photoshop and merged by selecting the move tool then dragging and dropping one of the images on top of the other.  A mask was then added to the highlights layer allowing me to use the graduation tool to lighten the foreground whilst keeping the detail in the sky.


Although I managed to lighten the area I had chosen successfully, I wanted to bring some more detail back into the sky.  This was achieved by selecting the Burn tool and using it with a fairly large paintbrush size and mid opacity.

Final Image following merging


Tuesday, 24 September 2013

Photoshop selection tools -Tues 24/09/13

Selection Tools

The selection tools in Photoshop are used to enable the process of making selections of shapes, colors, and objects inside of Photoshop, and positioning them in the working image area. This can be useful for when you want to edit, copy or remove parts of an image.
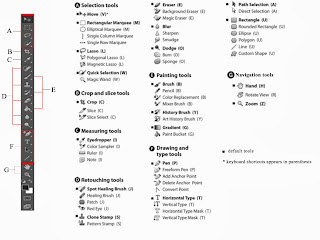
The selection tools are located on the left hand side tools panel within Photoshop (CS6).  The first family of selection tools are the Marquees, which, are very basic selection tools and are not adjustable after the selection has been made.


The Rectangular Marquee Tool is going to be utilised to select a part of my image


Now that I have selected the area, I am going to copy the selection to a new canvas using Edit/Copy' and then create a new image using File/New.  Edit/Paste is then used to copy the selection to the new canvas. This new image will default to the size of the selection I previously selected and copied.


To add a vignette, using the marquee tools (there are better and more manageable method's), however, in this instance I am going to use the Elliptical Marquee Tool.
The centre area of my image is selected and then in order to avoid a hard outline and soften the edge, I am going to feather my selection using Select/Modify/Feather and give it a value of 300.
Select/Inverse is then chosen to select the outer area of the image (outside of the selection) and I have then used the paint bucket (black) to darken the selected area.  Selecting an opacity of around 70% has effectively darkened the outside area creating the vignette I intended, which, has drawn attention to the religous preacher in the centre of the frame and the space he appears to have created around himself.

The same effect can also be created using a white vignette but in my opinion, black is the correct choice for my subject.
The final members of this group are the Single Row Marquee Tool and the Single Column Marquee Tool.  As suggested by the name, these tools just select a single row of pixels, either vertical or horizontal. They can be used for adding straight lines or a border to an image.

The next tools in the marquee family are the lasso tools of which there are three choices.

The following screen shots show my use of selection tools, cutting, and pasting between two identical images. The final result shows the original image changed to black and white and then selected colour inserts from a duplicate file added to create a 'new' image.


Final Result

Monday, 23 September 2013

Destroy Self Portrait

Destroy Portrait Exercise

After viewing and discussing 'Destroy Rankin' photography in class we were asked to attempt this ourselves.  To complete this exercise, I felt is was necessary to take a reasonable portrait of myself.  I made the effort to wear make-up and posed for the portrait in order for the printed photograph to feel 'wrong' to destroy.

The original image
f.4.8 1/25s ISO-640 60mm

The following image is the manually destroyed photograph.  This was printed at a local shop, sized 10"x8” in order for it to be effectively manipulated.  I thought about how to do this and decided that actually letting my learning disabled, autistic son destroy it and by doing so give away control of the finished result was the best method.  My son was reluctant to do at first but once he started the task, he found it hilarious and didn't want to stop.  I actually think my son's efforts are far better than my digitally destroyed version. The destroyed photograph has been re-photographed by myself using my digital camera in order to create a digital version for uploading to my blog.

Manually Destroyed Version


The following photograph is the digitally destroyed version that I created using Photoshop.  This was achieved by importing the original file into Photoshop then using the Marquee tools to select different areas of the image and copying the selections to a new canvas per selection. These new images then need to be re-sized by using Image/Image size and reducing the resolution and document size. In order to create the montage, a new and blank canvas is then created ready to copy the re-sized selections.

Digitally destroyed version (boring by my son's standard)


My Evaluation
This exercise actually turned out to a lot more 'fun' than I expected it to be. I was very satisfied with my decision to encourage my son to destroy the printed photograph rather than attempting to alter it myself.  I also think that letting my son 'do the damage', was closer to Rankin's original idea because he didn't directly destroy his images either.  The digitally destroyed version was a good exercise using Photoshop but nowhere near as creatively expressive as the manually destroyed image.

Tuesday, 17 September 2013

File Opening, Levels and Curves, Including Resizing and Copywriting

Opening a file and using non-destructive editing in Photoshop using the Layers pallet and Curves tool

The image below is the one I have chosen to edit in Photoshop which was opened by selecting file and then open in Photoshop (CMD + O is the shortcut). I then chose the file that contained the following image and clicked 'open'. On a MAC the file can be simply dragged to the Photoshop logo on the dock.  I chose this image to work with as it was a cloudy day and the sky looks over exposed and the foreground a little dull.
f/9 1/60s ISO-100 55mm

First point to note is that we should avoid making adjustments directly to an an image that we have opened using the menu bar at the top of the page in Photoshop - this is classed as destructive editing.  Non-destructive editing is achieved by using the layers pallet on the right hand side of the window in Photoshop or opening the layers pallet by using 'CMD and L' if it is not already open.  The next step is to create a duplicate background layer by selecting the keys 'CMD and J'.  This ensures the editing will take place on a layer and not on the original background making it very easy to backtrack if a mistake is made during editing.

Screen shots on a Mac are created by using the CMD, SHIFT and 3 keys
Screen shot showing the layers pallet on the right hand side.

Levels and curves are considered two of Photoshop's most important image editing tools.  Levels has three adjustment points whilst Curves has up to 14 adjustment points and is very useful for fine tuning the contrast in greater detail.

Using Curves to manipulate the exposure in my image.
Screen shot showing the curves window open.

The Final Result

By using the curves tool, I managed to bring some detail back into the sky whilst slightly improving the brightness within the rest of the scene. I also adjusted the mid tone to reduce the left-hand side flowers vividness in order to make them a little less distracting. Whilst this didn't have a profound effect on my image, I still found it a very useful tool and managed to 'subtly' improve the overall image.

Non-Destructive Editing in Photoshop Using Levels

The image below was taken in a dark area with low evening light. I liked the composition of dog walkers within the frame so will try to lighten the area of activity to improve the overall image.

 Image file opened in Photoshop and Levels selected in the Adjustment Layers Menu
In the levels window, the histogram is showing there is very little at the white end of the graph whilst there is too much black at the opposite end of the graph. Holding down the 'Alt' key while moving the black slider turns the screen white with dark areas, which lets me adjust the darker areas in a more controlled manner. The same is repeated with the white slider, only this time the screen turns black and as the highlighted areas start to appear, these areas will appear 'burnt out' so it is important to control this aspect as well.
To alter the colour balance of the image, I have selected the centre eye dropper, this is mid grey. I have then chosen the grey path in my image to act as neutral grey. Clicking on the area changed to colour balance to a satisfactory result.

The Final Result

 Re-sizing an image for use on the web with Copywrite notes

In order to prepare my images for uploading to the web, resizing and coprwriting is necessary. This enables the uploaded image to display correctly on most screens when being viewed.  The copywriting is to help protect my ownership of the image.

The image resizing is achieved by selecting the keys 'alt, ctrl and I' together to allow the 'Image size' dialogue window to be visible. A resolution of 72 pixels/inch can then be typed in the appropriate box and change the width to 7 inches in the appropriate drop down box.  Saving the file as a JPEG is the preferred choice when resizing an image for the web as can be seen in the screen shot below.
To add a copywrite to the image, first select the text icon on the left hand side tools pallet, next place the cursor on the image where you would like the copywrite to appear and then select the keys 'Alt and G'. A name or company can then be typed next to the copywrite sign.

Original Image
f/9 1/250s ISO-100 13mm

Screen shot of saving the resized image in JPEG format

Resized and Copywrited for use on the web


When resizing, copywriting and saving multiple images for use on the web (especially for blogger), we can create an 'Action' in Photoshop to save a lot of time.  This is achieved by pressing the keys 'Alt and F9' to display the Actions menu. A new Action needs to created by selecting the correct icon at the bottom of the Actions window, giving it a suitable title and then selecting the red button to begin recording all of the required actions.  Repeat the steps already explained on 'Re-sizing an image for use on the web and Copywriting' then select the white square at the bottom of the actions window which will effectively end the action recording session.

Recording the processes to resize and copywrite an image

Screen shot showing an 'Action' recording session being applied

Zooming the image in once the 'Action' has been applied prior to saving

Screen shots on a PC are created by using the method outlined in this screen shot