Monday 30 September 2013

Shutter Speed - Mon 30/09/13

The shutter is a cover over the sensor that controls the length of time that light reaches it and that length of time has a direct effect on our images.  A fast shutter speed will freeze movement in an image as apposed to a slow shutter speed which, will blur movement.  As a general rule we are told that 1/60s is the slowest shutter speed that we should be using when hand holding our cameras. However this rule can be broken by engaging some practical tips i.e holding our arms closely to our body, supporting our camera with one hand underneath and slowly breathing out whilst gently pressing the shutter button.

 All images are taken using Shutter Priority (S) with auto ISO feature enabled.

This first image was taken using a much slower shutter speed than I would normally use when hand holding my camera but it does demonstrate that with care and good technique, a reasonable result can be achieved without too much camera shake.
1/8 sec f/16 ISO-100 85mm

As this is not a moving subject, there is little discernable difference between this and the last shot which leads me to think that I should be trying to use a slower shutter speed more often.
1/125 sec f/5.6 ISO-250 85mm

Once again this image doesn't vary much at all from the previous shot's confirming my belief that I can slow the shutter speed down when I need to without the use of a tripod.
1/500 sex f5.6 ISO-1100 85mm

Slowing down the shutter speed i.e 1s or longer also allows us to be creative with our photography in different ways but particularly with blur.  By moving the camera whilst the shutter is open, a variety of effects can be achieved.
We discussed Chris Friel's work in class who was originally a painter and now creates many semi-abstract images with digital photography.
The following images are my first attempts at this area of photography.

I feel that I used too much travel too quickly with my camera with this shot as it is difficult to tell what the image is meant to be at all.
 3 sec f/22 ISO-100 16mm

I prefer this image as it is more obvious that there are trees and leaves on the ground with the college in the background. I still think I have moved the camera too quickly and would have preferred to pan with a tripod.
 3 sec f/22 ISO-100 16mm

Moving the camera up and down during exposure time was interesting but again I think I moved the camera too quickly.
3 sec f/29 ISO-100 26mm

I quite liked the diagonal image as the college is quite apparent in the background.
3 sec f/29 ISO-100 26mm

Without moving the camera intentionally, a long shutter speed on a moving person can create quite a ghostly effect.
3 sec f/22 ISO-100 16mm

Another attempt at slow shutter speed abstract taken in Sankey Valley Park
 3 sec f/25 ISO-100 18mm

Another way of being creative with an image is to use open flash. By using front and rear curtain sync


Wednesday 25 September 2013

STUDY SKILLS - Project Planning and Time Management - Weds 25/09/13

Workflow Chart

This week our task was to create a workflow chart in order to plan a fashion shoot.

Within our group, we decided to allow two weeks for our project, however we did all agree that a longer time period was needed and four weeks would have been more manageable and realistic.

During our initial group discussion a spider-gram was drawn up with ideas from all of us.  I felt this was good practice as we all had ideas and contributed in a positive way toward the final planning GANTT chart.

 Fashion Shoot Pre-production

  The Shoot

 Post Production

Group effort GANTT chart


Planning and time management activities - Weds 18/09/13

Study Skills

Our HE Tool Kit on a Wednesday is currently based around planning and time management activities.

Our first activity for HE Tool Kit is time management plans/skills i.e. mind mans and creating a GANTT Chart. This is a live document that is used for project planning/developing and time keeping.  Just as a blog helps to organise college work and can be edited, so can the GANTT chart.  It is actually important to remember that a GANTT chart is meant to be edited/updated whenever a change happens.

There are five pieces of evidence required in the HE Tool Kit module
  1. Planning and time management activities
  2. CV
  3. A personal statement
  4. Interview skills activity
  5. Presentation
An assignment for study skills will need to be after January - 1000 word essay/report, reflecting on an aspect of the syllabus.
Remember the statement, 'Failing to plan is planning to fail'.


Tuesday 24 September 2013

Photoshop selection tools -Tues 24/09/13

Selection Tools

The selection tools in Photoshop are used to enable the process of making selections of shapes, colors, and objects inside of Photoshop, and positioning them in the working image area. This can be useful for when you want to edit, copy or remove parts of an image.
The selection tools are located on the left hand side tools panel within Photoshop (CS6).  The first family of selection tools are the Marquees, which, are very basic selection tools and are not adjustable after the selection has been made.


The Rectangular Marquee Tool is going to be utilised to select a part of my image


Now that I have selected the area, I am going to copy the selection to a new canvas using Edit/Copy' and then create a new image using File/New.  Edit/Paste is then used to copy the selection to the new canvas. This new image will default to the size of the selection I previously selected and copied.


To add a vignette, using the marquee tools (there are better and more manageable method's), however, in this instance I am going to use the Elliptical Marquee Tool.
The centre area of my image is selected and then in order to avoid a hard outline and soften the edge, I am going to feather my selection using Select/Modify/Feather and give it a value of 300.
Select/Inverse is then chosen to select the outer area of the image (outside of the selection) and I have then used the paint bucket (black) to darken the selected area.  Selecting an opacity of around 70% has effectively darkened the outside area creating the vignette I intended, which, has drawn attention to the religous preacher in the centre of the frame and the space he appears to have created around himself.

The same effect can also be created using a white vignette but in my opinion, black is the correct choice for my subject.
The final members of this group are the Single Row Marquee Tool and the Single Column Marquee Tool.  As suggested by the name, these tools just select a single row of pixels, either vertical or horizontal. They can be used for adding straight lines or a border to an image.

The next tools in the marquee family are the lasso tools of which there are three choices.

The following screen shots show my use of selection tools, cutting, and pasting between two identical images. The final result shows the original image changed to black and white and then selected colour inserts from a duplicate file added to create a 'new' image.


Final Result

Monday 23 September 2013

Destroy Self Portrait

Destroy Portrait Exercise

After viewing and discussing 'Destroy Rankin' photography in class we were asked to attempt this ourselves.  To complete this exercise, I felt is was necessary to take a reasonable portrait of myself.  I made the effort to wear make-up and posed for the portrait in order for the printed photograph to feel 'wrong' to destroy.

The original image
f.4.8 1/25s ISO-640 60mm

The following image is the manually destroyed photograph.  This was printed at a local shop, sized 10"x8” in order for it to be effectively manipulated.  I thought about how to do this and decided that actually letting my learning disabled, autistic son destroy it and by doing so give away control of the finished result was the best method.  My son was reluctant to do at first but once he started the task, he found it hilarious and didn't want to stop.  I actually think my son's efforts are far better than my digitally destroyed version. The destroyed photograph has been re-photographed by myself using my digital camera in order to create a digital version for uploading to my blog.

Manually Destroyed Version


The following photograph is the digitally destroyed version that I created using Photoshop.  This was achieved by importing the original file into Photoshop then using the Marquee tools to select different areas of the image and copying the selections to a new canvas per selection. These new images then need to be re-sized by using Image/Image size and reducing the resolution and document size. In order to create the montage, a new and blank canvas is then created ready to copy the re-sized selections.

Digitally destroyed version (boring by my son's standard)


My Evaluation
This exercise actually turned out to a lot more 'fun' than I expected it to be. I was very satisfied with my decision to encourage my son to destroy the printed photograph rather than attempting to alter it myself.  I also think that letting my son 'do the damage', was closer to Rankin's original idea because he didn't directly destroy his images either.  The digitally destroyed version was a good exercise using Photoshop but nowhere near as creatively expressive as the manually destroyed image.

Aperture - Depth of Field - Mon 23/09/13

This mornings subject is Aperture, it's function in allowing light to enter the lens and how it relates to depth of field within a photograph.  A wide aperture i.e a low numbered f stop (f/1.8) will create a wide/shallow depth of field as opposed to a narrow/long depth of field which is a high numbered f stop (f/22).

I have chosen three photographers work to illustrate a wide/shallow depth of field.

1) Vivian Maier - Street Photographer
A street photographer who uses both wide/shallow and narrow/long depth of field (DOF) but mainly wide/shallow DOF when specifically photographing people in order to bring attention to the person she is depicting.  I chose this particular image because I like the way the photographer has drawn attention to the boy and the box, it makes me question what his reason for being there is and whether he is being cheeky by rooting in a box that doesn't belong to him.


2) Heather Angel - Nature Photographer
A nature photographer who uses a lot of macro photography to isolate detail in both plants and animals.  Using a wide/shallow DOF once again brings attention to her chosen subject.  In this image, the wide/shallow DOF really makes me study the flower and I feel adds a tranquil quality to the image as the distant lily pads are out of focus.


3) Eve Arnold - Photojournalism Photographer
Very famous for her work with Marylin Monroe and uses a wide/shallow DOF to bring as much attention as possible to her work.  My attention is really drawn to the woman sitting at the bar and I feel the wide/shallow DOF heightens the perception of loneliness and perhaps sorrow that I feel is portrayed here. I also wonder if the empty glass is hers or has she been left alone?  The wide/shallow depth of field in the image is further pronounced by the fact there is an out of focus area both in front of the woman as well as behind her.


The following three examples I have chosen are to illustrate a narrow/long DOF.

1) Joel Meyerowitz - Street/Portrait/Landscape Photographer
This photographer quite often uses a narrow/long DOF in his street photography to capture as much detail as possible in the scene he is capturing.  My eye roams right around the entirety of this image and it projects a feeling of 'business' to me which wouldn't happen had the photographer used a wide/shallow DOF.


2) Richard Avedon - Portrait Photographer
Extremely famous portrait photographer who traditionally uses a wide/shallow DOF in his work but however in this portrait taken from his Reportage photography about a mental institution he has used a narrow/long DOF.  This allows the viewer to see all of the in-mates and their environment and 'feel' for the plight of these people.  If he had used a wide/shallow DOF this image would not have the same impact or convey the message in such a detailed way.

 
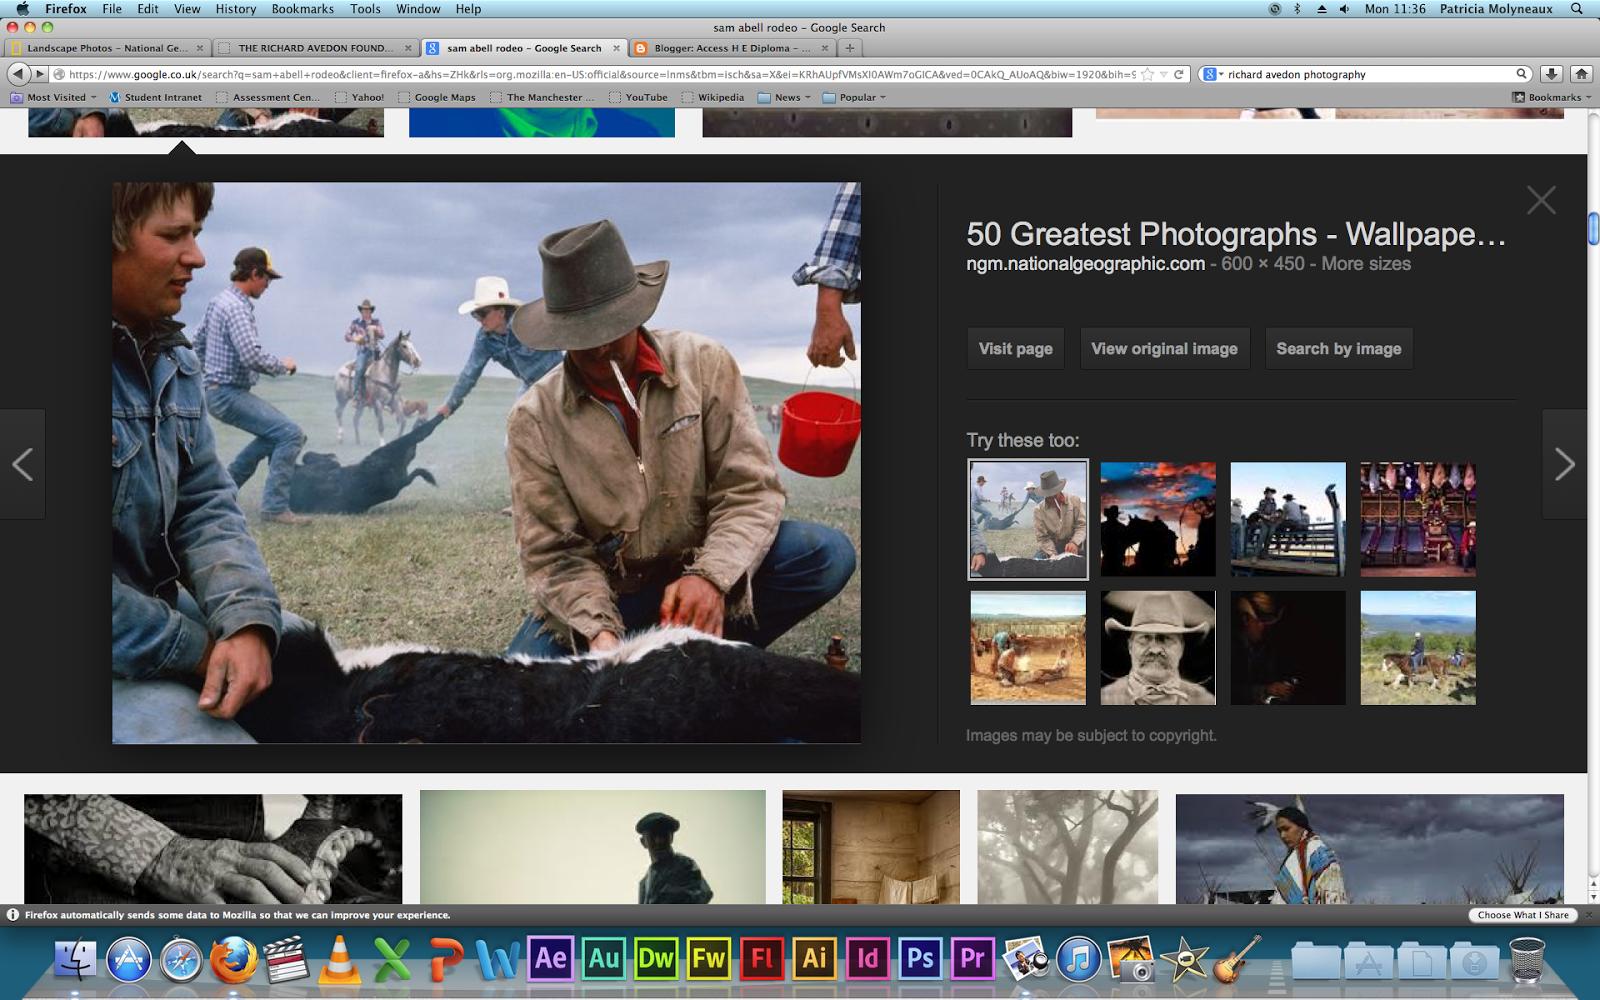
3) Sam Abell - Photojournalism Photographer
This photographer, well know for his work with National Geographic, utilises a narrow/long DOF in his photography a great deal. In this image a narrow/long DOF has been used to great effect as Sam Abell likes to create depth within a photo and this wouldn't be achievable by using a wide/shallow DOF.


My Own Work

The following image is one I have taken that illustrates a wide/shallow DOF.  It is not taken using the widest aperture available but because of my close proximity to the subject, the aperture I have used has resulted in with only a few of the flower heads and leaves in focus.
f/5.6 1/320s ISO-200 110mm

The next two images have a similar view point but are taken using a narrow/long DOF (f/20) and a wide/shallow DOF (f5.6).  It demonstrates that even at a fairly close proximity to the subject a narrow/long DOF will show a lot more detail within the image. The first image appears to be very 'busy' to my eyes but in the second image of the spider and web, more attention is drawn to the spider as the background detail is out of focus.
f/20 1/80s ISO-1250 85mm
f/5.6 1/80s ISO-200 85mm
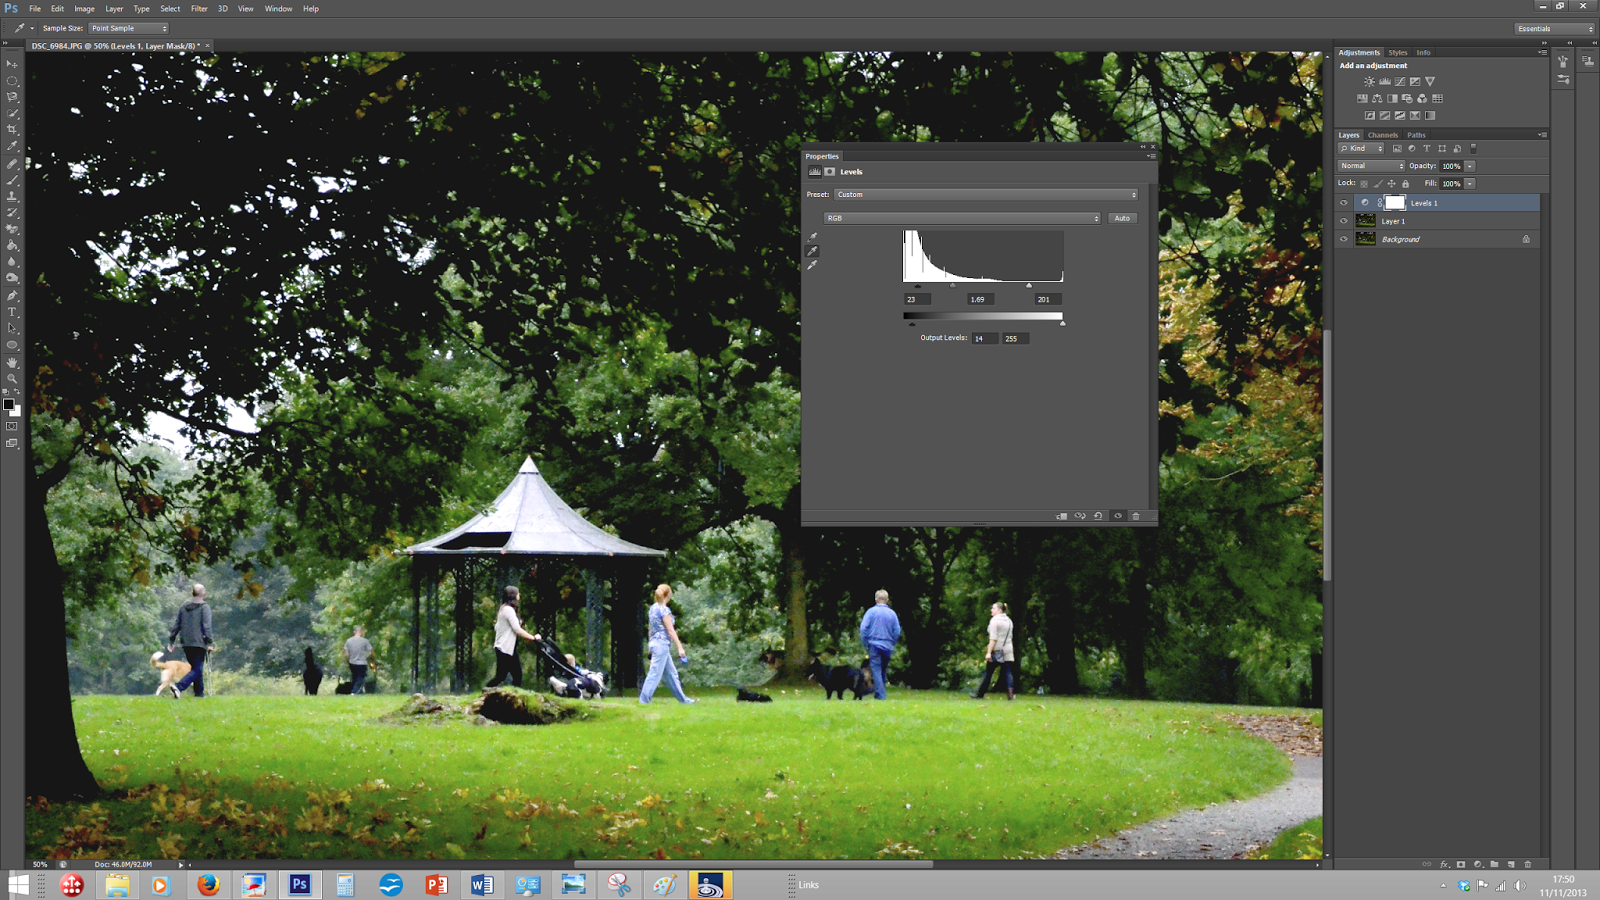
This image of a suspension footbridge is taken using a narrow/long DOF in order to make sure the posts at the end are in focus as well as the trees behind them.  I think that the narrow/long DOF, keeping all of the image in focus gives the bridge a sense of purpose.
f/18 1/60s ISO-800 50mm
The following two images are once again a comparison test that demonstrates the effect of using a shallow/wide DOF as opposed to a long/narrow DOF.  I have used a single point focus area and selected the flowers at the bottom of the path to focus on in both of the images.

  This image is quite an extreme shallow/wide DOF and because of that I feel it has more impact.
f/1.8 1/640s ISO-100 50mm

A very ordinary looking image that I have used a long/narrow DOF which does demonstrate how DOF affects an image with the in focus area being from the front right to the back.
f/22 1/40s ISO-800 50mm


Tuesday 17 September 2013

File Opening, Levels and Curves, Including Resizing and Copywriting

Opening a file and using non-destructive editing in Photoshop using the Layers pallet and Curves tool

The image below is the one I have chosen to edit in Photoshop which was opened by selecting file and then open in Photoshop (CMD + O is the shortcut). I then chose the file that contained the following image and clicked 'open'. On a MAC the file can be simply dragged to the Photoshop logo on the dock.  I chose this image to work with as it was a cloudy day and the sky looks over exposed and the foreground a little dull.
f/9 1/60s ISO-100 55mm

First point to note is that we should avoid making adjustments directly to an an image that we have opened using the menu bar at the top of the page in Photoshop - this is classed as destructive editing.  Non-destructive editing is achieved by using the layers pallet on the right hand side of the window in Photoshop or opening the layers pallet by using 'CMD and L' if it is not already open.  The next step is to create a duplicate background layer by selecting the keys 'CMD and J'.  This ensures the editing will take place on a layer and not on the original background making it very easy to backtrack if a mistake is made during editing.

Screen shots on a Mac are created by using the CMD, SHIFT and 3 keys
Screen shot showing the layers pallet on the right hand side.

Levels and curves are considered two of Photoshop's most important image editing tools.  Levels has three adjustment points whilst Curves has up to 14 adjustment points and is very useful for fine tuning the contrast in greater detail.

Using Curves to manipulate the exposure in my image.
Screen shot showing the curves window open.

The Final Result

By using the curves tool, I managed to bring some detail back into the sky whilst slightly improving the brightness within the rest of the scene. I also adjusted the mid tone to reduce the left-hand side flowers vividness in order to make them a little less distracting. Whilst this didn't have a profound effect on my image, I still found it a very useful tool and managed to 'subtly' improve the overall image.

Non-Destructive Editing in Photoshop Using Levels

The image below was taken in a dark area with low evening light. I liked the composition of dog walkers within the frame so will try to lighten the area of activity to improve the overall image.

 Image file opened in Photoshop and Levels selected in the Adjustment Layers Menu
In the levels window, the histogram is showing there is very little at the white end of the graph whilst there is too much black at the opposite end of the graph. Holding down the 'Alt' key while moving the black slider turns the screen white with dark areas, which lets me adjust the darker areas in a more controlled manner. The same is repeated with the white slider, only this time the screen turns black and as the highlighted areas start to appear, these areas will appear 'burnt out' so it is important to control this aspect as well.
To alter the colour balance of the image, I have selected the centre eye dropper, this is mid grey. I have then chosen the grey path in my image to act as neutral grey. Clicking on the area changed to colour balance to a satisfactory result.

The Final Result

 Re-sizing an image for use on the web with Copywrite notes

In order to prepare my images for uploading to the web, resizing and coprwriting is necessary. This enables the uploaded image to display correctly on most screens when being viewed.  The copywriting is to help protect my ownership of the image.

The image resizing is achieved by selecting the keys 'alt, ctrl and I' together to allow the 'Image size' dialogue window to be visible. A resolution of 72 pixels/inch can then be typed in the appropriate box and change the width to 7 inches in the appropriate drop down box.  Saving the file as a JPEG is the preferred choice when resizing an image for the web as can be seen in the screen shot below.
To add a copywrite to the image, first select the text icon on the left hand side tools pallet, next place the cursor on the image where you would like the copywrite to appear and then select the keys 'Alt and G'. A name or company can then be typed next to the copywrite sign.

Original Image
f/9 1/250s ISO-100 13mm

Screen shot of saving the resized image in JPEG format

Resized and Copywrited for use on the web


When resizing, copywriting and saving multiple images for use on the web (especially for blogger), we can create an 'Action' in Photoshop to save a lot of time.  This is achieved by pressing the keys 'Alt and F9' to display the Actions menu. A new Action needs to created by selecting the correct icon at the bottom of the Actions window, giving it a suitable title and then selecting the red button to begin recording all of the required actions.  Repeat the steps already explained on 'Re-sizing an image for use on the web and Copywriting' then select the white square at the bottom of the actions window which will effectively end the action recording session.

Recording the processes to resize and copywrite an image

Screen shot showing an 'Action' recording session being applied

Zooming the image in once the 'Action' has been applied prior to saving

Screen shots on a PC are created by using the method outlined in this screen shot