Tuesday 27 May 2014

Lenses - Angle of View and ISO Ratings


Angle of View
Angle of view is dependent on camera and film or digital sensor size along with the chosen lens.

 
Lens choices

Wide Angle: This is a much shorter focal length than standard lenses and they see a wider view. They can cause distortion, making them unsuitable for portraits but very useful for interiors and giving depth to an image. It is usually possible to get quite close to your subject, allowing for creative distortion.
Wide angle lets us see the bigger picture and makes objects such as the railway bridge in this image look further away than it is.
24mm view


Standard: Closest to how the eye sees, used when we need to portray a scene or subject as an accurate representation.
The railway bridge looks about right distance away in this image taken at 50mm.
50mm view

Portrait: A short version of a telephoto lens, which, flattens the subject slightly giving a flattering effect. By bringing the subject closer we can create a more dramatic effect and cut out some of the foreground.
The railway bridge is starting to appear closer and the trees are beginning to look flattened as I zoom in to 70mm.
70mm view

Telephoto: This flattens perspective and brings your subject closer, allowing you to be selective with a particular part of the scene or subject.
Zooming in to 200mm really brings the railway bridge into view, cutting out a lot of the foreground and the trees appear like they are bunched together.

200mm view

ISO
Film or digital sensitivity is denoted by ISO (International Standards Agency) rating. The higher the number, the more sensitive the camera will be to light. Film with a rating of under 100 ISO is considered slow film and will produce the finest grain. A rating of 400 ISO and above is considered fast film and will give a grainier appearance.
ISO doesn't really apply to digital photography and selecting a high ISO rating will result in loss of detail. This is due to digital images being made up of square pixels and high ISO ratings result in artifacts, which, are corrupt pixels, showing the wrong colour. On more expensive cameras a higher ISO can be utilised without the same amount of 'noise' (pixel corruption) present.

Saturday 17 May 2014

Wet Plate Collodion - Ambrotype

Wet Plate Collodion - Ambrotype

History/Research

Wet-Plate process was invented by, an English sculptor and photographer, Frederic Scott Archer in 1851. He experimented with collodion in the hope of producing a photographic negative on ordinary glass plates.
He also found that underexposed very thin negative looks like good positive being placed on a black background. Such photographs on glass with black paint on one side called ambrotypes and on metal with black varnish called tintype (or Ferrotype).
The process is rather simple: bromide and iodide salts dissolved in collodion, which is a solution of pyroxylin in alcohol and ether. This mixture poured onto a cleaned glass plate, and allowed to sit for a few seconds. The plate then placed into a solution of silver nitrate in water, which would convert the iodide, bromide salts to silver iodide, bromide, respectively. Once this reaction complete, the plate removed from the silver nitrate solution, and exposed in a camera while still wet. It developed with a solution of iron sulfate, acetic acid and alcohol in water. Then plate fixed with sodium thiosulfate. After that the plate washed with tap water. Finally it protected with gum sandarac varnish, taken from, EdinPhoto (2014).

Extract from Bland & Long Catalogue - 1856
Poison Notice to be displayed in the Darkroom - 1892


Photo-type Timeline

The following is a tutorial found on youtube, giving advice on current practice for the wet plate collodion process:


The following image depicts how current day photographer, Shane Balkowitsch has made good use of this Victorian process to great effect, attempting to duplicate the original wet plate taken by Mathew Brady on May 23rd, 1865, Balkowitsch has photographed Steve Alexander, an author on the subject, and re-enactor of General Custer. Most people would probably wrongly guess which one the original plate is.
General George C Custer - Then and Now (2013) Shane Balkowitsch with Matthew Brady

Below is photographer, Ian Ruhter, taking the wet collodion process to the great outdoors in style. Ruhter has an actual truck that has been converted into the worlds largest wet plate camera, allowing it to be taken anywhere that it can be driven to. The plates he creates are extremely large, expensive and adventurous, however he is realising his dream and produces amazing results.

Ian Ruhter - Truck converted into a wet plate camera

Mammoth Lakes (2012), Ian Ruhter

Yosemite (2014), Ian Ruhter


My Own Experience With Wet Plate Photography

In order to experience and practice this historic process for myself, I visited,
To begin, thoroughly clean the glass to be used, to ensure the collodion solution will adhere properly and smoothly to it. The edges of the glass can also be coated with egg white, using a cotton bud, to help the collodion stick and help prevent the picture lifting up and peeling away at a later date. The process I am describing is for producing an ambrotype, which, is using glass to make the plate but it can also be used for a ‘tin type’, using aluminium sheets.
  • Set up the camera position and focus on the chosen subject
  • Ready the plate holder for the sensitised glass
  • Once the plate is dry, it is ready for the darkroom to make it light sensitive 
I found the next part to be quite tricky and it is probably the most likely to go wrong.
  • The glass needs coating in an amount of the pre-measured and mixed collodion sollution with a spare bottle handy, to run off the excess liquid into
  • With fingers balancing underneath the glass, pour the collodion onto the plate and carefully rotate the solution to get an even coverage
  • Once covered and the excess has been drained off from the corner, it will need immersing in the silver nitrate bath, treated side faced away from the holder for approx 3 minutes
  • Lights now need to off and only the safe light is used as once removed, the plate will be light sensitive
  • When removing from the silver bath, allow to drip first before carefully wiping the back of the plate
  • Insert face down in the plate holder then securely close, ready to take the picture
Once the plate had been inserted into the camera and my exposure had been taken, it was back to the darkroom to finish processing the plate. This has to be done fairly quickly as the solution must not be left to dry before developing and fixing.
  • Remove the plate from the holder and keeping it horizontal, apply a pre-measured amount of developer straight onto the coated surface, covering it as quickly and evenly as possible for approx 15 seconds
  • Rinse with water then then immerse in a fixer solution before washing with water again
  • Lights can be turned on again and the negative plate viewed against a black background
The image of my son was successful so once the plate had dried, the back was coated with black acrylic paint to turn it into a positive image. However, prior to it being painted, just as an experiment, the negative image on the glass was used to create a print on paper, using an enlarger. This process was very similar to the one I used for medium and large format film photography, already described in a previous blog post.

Test sheet created from the negative plate
The final printed photograph from the plate


A scanned image of the finished ambrotype

Evaluation
My son has been used as a model for several photographic processes in order for me to compare the methods and results in a balanced way. Wet plate has proved to be visually, the most impressive and technically, the most challenging to get right. I simply loved the tones and detail captured in the image and although, not their true colour, my son's eyes stand out and really hold my attention. I am very satisfied with the result I managed and happy that the process worked first time for me, although I think this was probably luck as I have tried again since this experience and failed to produce anything that looked like it was intended to. Holding the finished glass ambrotype image and the print, feels quite special as I am aware they are unique and there is no negative ready on standby to re-print if needed. I can repeat the process but it will never be the same image twice. This is exemplified in the re-enactment wet plate created by Balkowitsch, although it is very good, it isn't quite as good as the original in my opinion. I have viewed and admired the work of Balkowitsch, hopefully some of the drama and depth he manages to create in his wet plate images is also portrayed in my own attempt.
On reflection I feel the printed photograph from the plate, although exposure adjustable, didn't do the image any justice so in future, I don't think I would take this step. This is a process I would love to try outdoors, however I am aware it is a complex and cumbersome task as a portable darkroom is needed due to the timeframe for sensitising and developing the plates. Research shows me this has been accomplished though and taking inspiration from Ian Ruhter and his adventurous ideas, it is worth planning for a future project.

Bibliography

Alexeev, A. (2011). Wet-Plate Collodion Process – Ambrotypes. Available: http://www.alternativephotography.com/wp/processes/wetplate/wet-plate-collodion-process-ambrotypes. Last accessed 15th May 2014.

Balkowitsch, S. (2013). General George A. Custer Wet Plate Reenactment. Available: http://en.wikipedia.org/wiki/File:General_George_A._Custer_Wet_Plate_Reenactment_Image.jpg. Last accessed 16th May 2014.

Burgett, G. (2014). Capturing Yosemite Valley with the World’s Largest Wet Plate Collodion Camera. Available: http://petapixel.com/2014/04/24/photographing-yosemite-valley-with-the-worlds-largest-wet-plate-collodion-camera/. Last accessed 17th May 2014.

EdinPhoto. (2014). Chemicals for the Collodion and Albumen Glass Processes. Available: http://www.edinphoto.org.uk/1_early/1_early_photography_-_equipment_catalogue_1856_chemicals_for_the_collodion_and_albumen_processes.htm. Last accessed 14th May 2014.

Historic Camera. (2002). Photo-Type Timeline. Available: http://www.historiccamera.com/cgi-bin/librarium/pm.cgi?action=display&login=photo_type_timeline. Last accessed 15th May 2014.

Jacobson, Q. (2006). The Wet Plate Collodion Process . Available: https://www.youtube.com/watch?v=Gyf8fQOdvDs. Last accessed 12th May 2014.

Johnson, H. (2013). Bismarck man to recreate historic Custer photograph. Available: http://bismarcktribune.com/news/local/bismarck/bismarck-man-to-recreate-historic-custer-photograph/article_80d71c12-53be-11e3-8b35-0019bb2963f4.html. Last accessed 16th May 2014.

Wikipedia. (2014). Collodion process. Available: http://en.wikipedia.org/wiki/Collodion_process. Last accessed 10th May 2014.

Wednesday 14 May 2014

Introduction to Digital Imaging - Research

An Introduction to Digital Imaging - Research

An image from a book:

'Salford' (2000) Shirley Baker


This image is from a book called Streets & Spaces, Urban Photography by Shirley Baker.
Part of a series of photographs taken on the streets and spaces of Manchester and Salford, that were commissioned by The Lowry to revisit the areas Baker already knew and had photographed during the 1960s and 70s. It is a fascinating photo book that documents the social and environmental changes that have taken place between that era and the year of the millennium.

Taken in Salford in what looks like a neglected council estate, this image tells us so many things:
  • It portrays the children of that year and what they are wearing. They have recogniseable brand labels on, despite the poor surroundings
  • The boys glasses look like NHS standard issue - a sign of the social financial state along with the neglected environment
  • The same boy has a metal rod of some description, surely this should still be a toy at this age
  • The other boys appear to be enjoying causing discomfort to this boy, I wonder if they are his friends or enemies
  • So much litter and boarded up windows, no pride in the neighbourhood
  • A boy to the left in the image is smiling and waving coyly, he is set aside from the others, this gives him the appearance of a gentler nature
  • Some of the boys stand behind one another in a line, perhaps not wanting to be photographed
  • Not a place I would want to walk through on my own

An image from The Tate Gallery:

'Providence, Rhode Island', (1976) Francesca Woodman
One of the many self-portraits American photographer Woodman took during her all too short life, it is one of the few that features her face fully. Her images are shot on mainly on medium format film, giving them detail but retaining a slightly soft accessible quality. Woodman sadly took her own life at the age of 22, which, leaves the viewer to wonder if they are seeing into her troubled mind.

Taken on Rhode Island in 1976, it is a haunting image that is part of a very tragic and sad story:

  • Why does she want us to see her naked? Perhaps an exploration of her sexuality and femininity
  • She looks vulnerable and defensive by the positioning of her arms and feet
  • A small image in a large room, does she feel small?
  • The dark negative of a body on the floor looks like a shadow or ghost, it is actually an impression of herself
  • I wonder if the shoes are significant, are they to simply protect her feet or is it a message that she is not fully exposing herself
  • The surrounding environment is bleak and uninhabited, a stark contrast to her naked form
  • This leaves me with a feeling of isolation and sadness, this may be just how she felt, projected outwards in her photography

An image from a website:

'Qubar', (2007) Yuri Kozyrev
Found on 'Lensculture' website, this image has been taken by Yuri Kozyrev, a Russian photojournalist who is a contract photographer for Time. For the last 25 years, he has captured nearly every major conflict since the fall of the Soviet Union. This image is also part of a series that tells a very troubled tale of war.

Taken in Qubar in 2007, it features a US soldier numbering the necks of men and hands of women in that particular area:
  • An unhappy situation in a war torn country
  • Every family face I see, looks anxious and worried
  • Even the children are affected and one looks as if to see what is being written
  • I wonder if the family fully understand what is taking place, their worry is concerning
  • They look huddled together for protection
  • The soldier looks expressionless, just carrying out orders
  • A lot of ammunition can be seen behind, geared up for conflict
  • There is no resistance from the family suggesting compliance most likely due to the military presence

Bibliography

Baker, S (2000). Streets and Spaces - Urban Photography. Manchester: Lowry Press. p.10.

Kamber, M. (2014). Photojournalists on War . Available: https://www.lensculture.com/articles/michael-kamber-photojournalists-on-war?utm_source=General+List&utm_campaign=f89ebef0a1-Newsletter+Vol+19.14&utm_medium=email&utm_term=0_f1724e682d-f89ebef0a1-88770. Last accessed 14th May 2014.

Noor. (2014). Photographers - Yuri Kozyrev. Available: http://noorimages.com/photographer/kozyrev/. Last accessed 14th May 2014.

O'Hagan, S. (2010). Francesca Woodman – Review. Available: http://www.theguardian.com/artanddesign/2010/nov/21/francesca-woodman-photographs-miro-review. Last accessed 14th May 2014.

Pictures of the Year International. (2011). Photographer of the Year - Freelance/Agency. Available: http://www.poyi.org/69/41/index.php. Last accessed 14th May 2014.

Tate. (2014). Artist Rooms artist essay. Available: http://www.tate.org.uk/art/artists/francesca-woodman-10512. Last accessed 14th May 2014.


Art History - Modernism

Modernism - Class Notes

How have technical advances advances affected the manner in which photography has evolved?
 
The modernism movement arose in the late 19th and early 20th century and can be dated back to 'The Great Exhibition of 1851'. The Great Exhibition although at the time, it was presented as a great feat of modernism, its expression was early and only eventually influential. It served as an announcement of a new regime and presented 'new ways of thinking'.

The Great Exhibition (1851)

Opposition
The British bourgeoisie were strongly opposed and unwilling to accept modernism. They were a social class whose power came from employment, education and the industrialised world as opposed to those whose power came from being born into an aristocratic family. Their power waned as the advancement of industrial technology showed that they would not be needed anymore.
The Romantic movement also opposed modernism, the poets, William Blake and William Wordsworth called it 'monstrous', writing many poems to express their feelings towards the movement.
The Industrial Revolution
Through the industrial revolution, new ideas were being presented that caused excitement and rebellion against 'traditional' thinking.
'We affirm that the worlds magnificence has been enriched by a new beauty, the beauty of speed.' Futurist Manifesto (1905).
These new ideas had started to replace traditional thinking by which, the new modern world had started to rely on. Through this movement became a dependence, a 'faith in machines', which, is ever more apparent in recent times.


  • The Eifel Tower, built in 1889 is viewed as a personification of 'the melding of man and machine'
  • Considered an engineering marvel of the 19th century 
  • Philosopher 'Roland Barthes', saw projections of the two sexes incorporated into the stucture


Lewis Hine was a key photographer during this period of transformation:

Icarus, (1931) Lewis Hine


  • Depicts man's faith in technology
  • Contrasts with traditional Neoclassicism thinking, in which the higher up in a painting one was, the closer to god they were.
  • Technological advancements make this image possible
  • If this man falls he would most certainly die


 This image is likened to that of the Greek myth 'Icarus':
The Sun or the Fall of Icarus, (1819) Merry-Joseph Blondel


  • Icarus, the son of a master crafstman 'Daedalus', attempts to flee Crete with wings constructed by his father, made from feathers and wax
  • Warned by his father not to fly to high or low
  • Ignored the warnings and flew too close to the sun, resulting in his wings melting
  • Fell to the sea and drowned 


Task - From Modernism to Post-Modernism 
Compare the works of  Lewis Hine and Sebastiao Salgado
'Power House', (1920) Lewis Hine
'Kuwait', (1991) Sebastiao Salgado


Lewis Hine:
  • Taken during the era of the great depression
  • Depicts masculinity
  • Surrounded by the machinery that defines his job
  • Man winning against machinery, taut muscles straining
  • Raises the profile of manual labour
  • Very clean and well groomed look to the young man depicted
  • Looks posed, not natural, the machinery too clean
Sebastiao Salgado:
  • Direct comparison features a male worker set against circular object
  • Projects the entirely opposite message of Hines promotion of industry
  • Looks downtrodden, beaten by machine perhaps
  • On first inspection, his role is not made clear by the surroundings
  • Completely covered in what looks like oil, modern life biting back
  • Technology and machinery may have made us lazy, the man is overweight and not perhaps up to the task before him
  • Not staged, looks natural and realistic
  • Has industry turned against us?
 

Tuesday 13 May 2014

Art Movement History

Brief History of Art from Neoclassicism

Class Notes


Neoclassicism (1750-1820)
  • The church dominated
  • People in power use art to keep power
  • Low Literacy amongst the general people, making art a tool
  • Heaven and Hell


Romanticism (1800-1850)
  • Revolt against aristocratic, social and political power
  • The age of enlightenment
  • An escape from modern life


Realism (1850-1880)
  • The depiction of subjects as they appear in real life


Impressionism (1860-1920)
  • Artist concerned with the play of light and tones
  • A different way of seeing  


Modernism (1860- present)
  • A philosophical movement that arose from the transformations and developments of Western society
  • Celebration of science, technology and industry
  • Socially progressive 


Art Nouveau (1890-1910)
  • New art
  • Focused on the decorative arts dedicated to natural forms
  • Widespread and highly commercial  


Bauhaus (1919-1933)
  • A school in Germany which, aimed to combine crafts and the fine arts
  • Famous for the approach to design that is well publicised 
Post-Modernism (1960's- present)
  • Movement in the arts and architecture
  • Criticism that rejected the modernist avant garde
  • Passion for the new

Sunday 11 May 2014

Abstract Photography - Unit 3 Digital Assignment


Abstract Photography

Abstract art and photography has interested for me as long as I can remember, however I have not always been entirely sure what the defining factor that classes an image as abstract is.  It is perhaps a little strange that I seek clarification on a subject, which is by all accounts not clear, which is supported by Rossbach (2011) who states ‘Abstract photography is the photographic art that is not a standard representation of a traditional scene, or real or known objects in the natural world’. Abstract photography, alongside drawings and paintings, concentrates on shape, form, colour, pattern and texture. We are quite often unable to view the whole object and the focus, if indeed there is any, will quite often only be a small part of the image.


Looking at, and learning from art history, it is easy to witness how the Impressionism art movement (1860-1920) influenced photography and vice versa at the end of the 19th and early 20th century. Photographers strived to achieve an artistic result in their captured images and some painters visibly changed their composition rules, which, were originally exclusive to photography. At this time, it was an exclusive group of Artists, and access to these works would have been through galleries and exhibitions aimed at the affluent society, rich enough to buy them. As we move forward in time, access to art work and learning new techniques has become a much simpler affair. The era of digital cameras and easy access to the internet has enabled a wide audience the chance to learn these skills due to online written tutorials and video instructions on websites such as ‘youtube’.

For this assignment I wish to explore some of the different techniques that are used to create abstraction in photography as well as examine the diverse effects that have been created using the various techniques. As described by Guy (2012), ‘the subject tends to come second to seeing…


·       Patterns.

·       Textures.

·       Angles.

·       Proximity (closeness and distance from the subject).

·       Crop (especially of segments or parts of the whole).

·       Colour variation.

·       Tonal variation.

·       Hard or soft light rendering of the subject.

·       Shape (2D).

·       Form (3D).

·       Curves.

·       Geometry.

·       Focus and depth of field.

·       Blur.

·       Expression of movement’.


This has led me to research photographers who specialise in the area of abstract photography and how they have achieved the results they produce.

One of the photographers we have discussed in class and I have come to greatly appreciate is ‘Chris Friel’. The following is an example of his work and one of the techniques he uses known as ‘multiple exposure photography’:


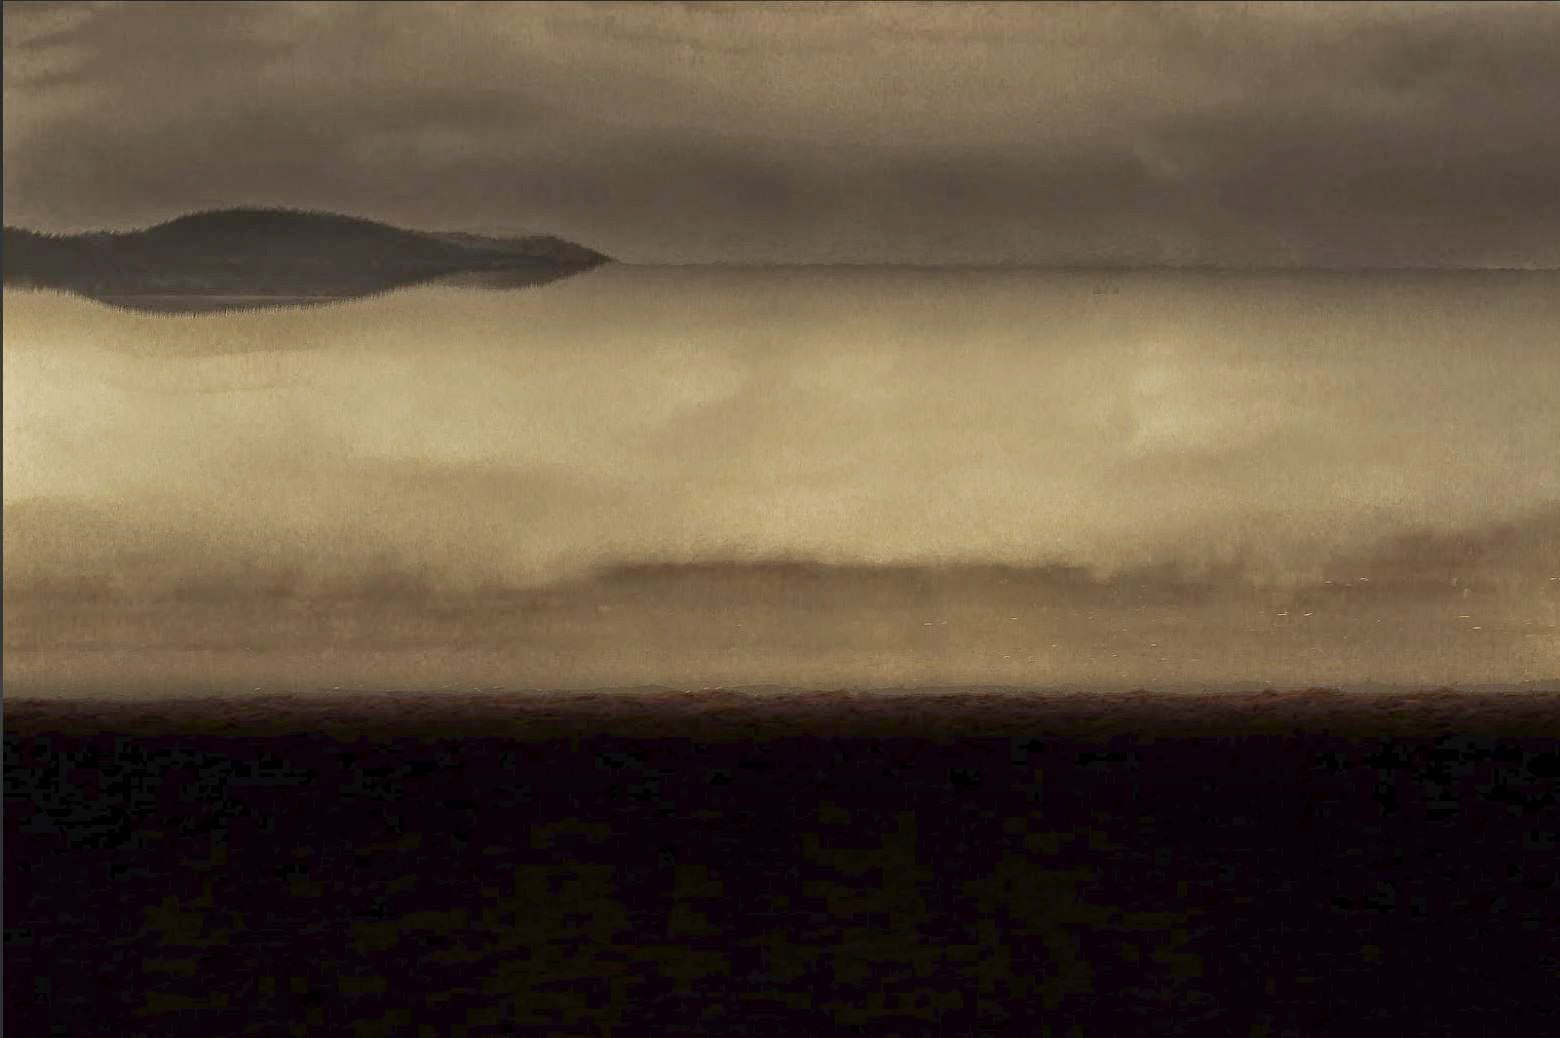
‘Lake 8’, Friel, C. (2014)
In this image, to achieve abstraction, Friel has used eight multiple long exposures ‘in camera’.  This is a function available on certain digital camera models which, as the name suggests, takes more than one exposure on a single frame. This is a long standing feature of film cameras, whereby the film would not be advanced following releasing the shutter, capturing multiple images on one area of film. This can be achieved digitally, post shooting in Photoshop, however when it is enabled in the camera settings, it is possible to assess the result you have attained straight away. With this method and indeed all methods, the camera can be either, used free hand or mounted on a tripod depending on the effect you wish to achieve. Using the camera free hand will result in much more blurred image and is less controllable but ultimately more creative, as is claimed by Chinnery (2013) ‘each image is truly unique and with that comes a certain level of creative satisfaction’. I find this image strangely relaxing even though the dark tones have been accentuated due to the technique and it makes me think of solitude.


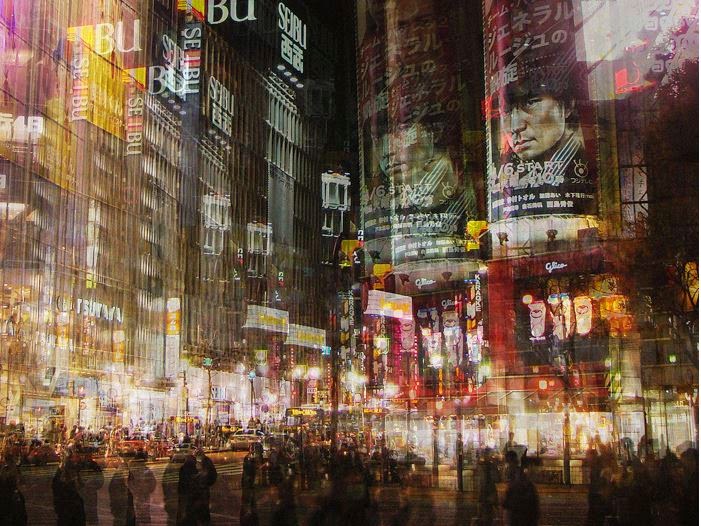
‘Shibuya’, Jung, S. (2010)


A very different result and effect using multiple exposures, ‘Jung’ has captured and accentuated the bustling streets of Japan with the method. My eyes are not sure where to look first and discover something new every time I view this image. This is not something I would mount on my wall, however I do appreciate it.


The next method I am going to explore is ‘intentional camera movement’ or ICM. This technique is described by Stephens (2012) as ‘Intentional Camera Movement is when the camera is moved in horizontal, vertical, diagonal or random directions while the shutter is open. The resulting image is deliberately blurred and often abstract’.  I have made a few attempts at this technique myself and found it requires a long or slow shutter speed of anything from 1/20 to 5 seconds to achieve a satisfactory result. Consequently low light is an advantage to ICM or acquiring a neutral density filter to restrict the amount of light entering the lens during shooting is needed to avoid over exposure. I also find it best to move the camera in line with the subject and keep the movement as smooth as possible.


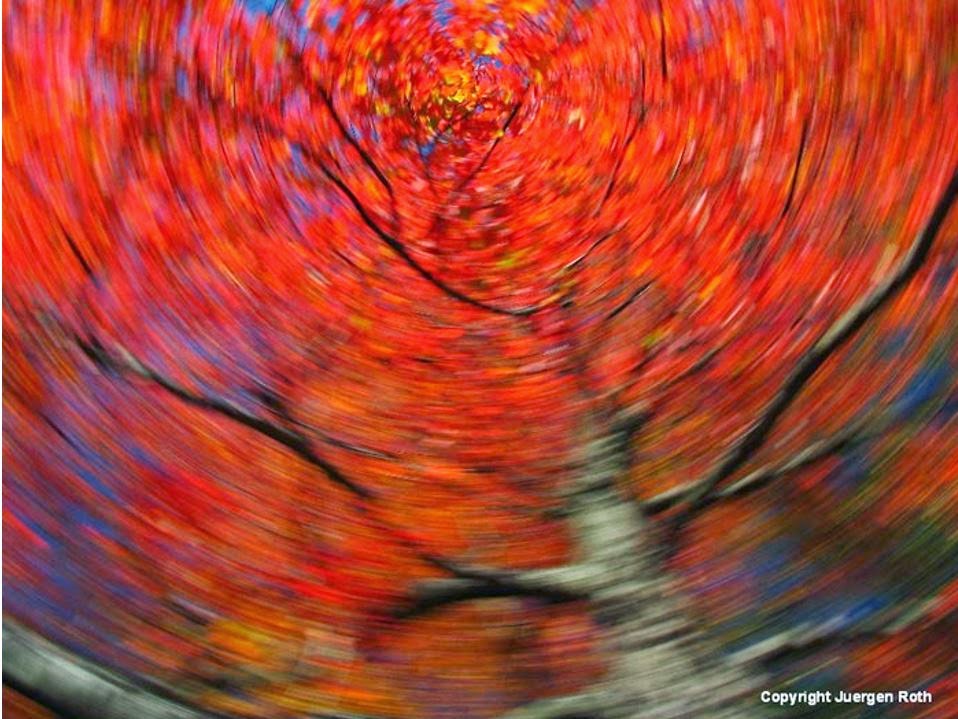
‘Fall Tree Carousel’, Roth, J. (2008)


I particularly appreciate this image as it conjures up thoughts of Autumn wind in my mind and the photographer, Juergen Roth (2012) reveals his thoughts on his technique by saying, ‘The right combination of shutter speed, aperture setting, and ISO setting in combination with the actual camera movement will produce the desired blur and an artistic abstraction of the scenery’.


Abstract photography can also be achieved through macro or close-up work as described by Humphries (2013, p7) ‘Viewed through the close-up lens, the world reveals detail, pattern and beauty that otherwise go unnoticed’. Getting in very close to a subject and only revealing a small part of its existence takes our attention away from what it is supposed to be and lets us concentrate on the colours and form before us.
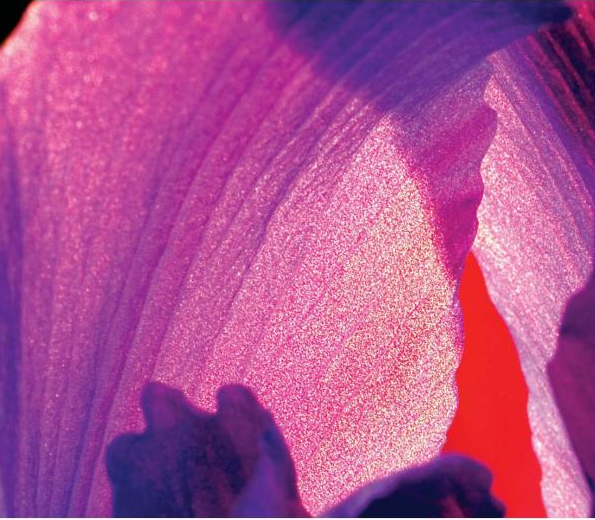

Iris’, Davis, H. (2009)


In this image by photographer and author, Davis (2009, p46), he explains it by saying, ‘When I framed this composition, I was struck by the intense colours and abstract shapes. Davis (2009, p38) had also stated, ‘By completely divorcing the image from its subject matter, the viewer is compelled to respond to the colours and composition of the abstraction’.  The image invokes a warm happy feeling, making me think of summer.


Conclusion/Evaluation

My research into abstract photography has led me to understand there are many different methods to achieve a satisfactory image and it is personal choice as to which one is utilised. Ultimately it takes a lot of practice and patience to master any specialised genre as is claimed by Friel (2010, p4) quoting Frank Grisdale, during an interview with Parkin (2010, p4) quoting ‘I think Frank Grisdale has quoted the 10000 hour rule in the past - the idea that if you spend 10000 hours practicing anything you will eventually achieve some sort of success in that field’.


This assignment research has also enlightened me to the fact my own DSLR camera has the capability of taking multiple exposures which I had no idea about prior to this. I am also quite fortunate enough to have access to a Macro lens and plan to experiment with close-up work to create my own abstract imagery. Mood and feelings can affect the outcome of your image, which is quite often the case but is even more pronounced when trying to create an abstract image, something to bear in mind with my own practice. I am most interested in the multiple exposure method and feel that exploration into this area of photography has been of great worth. Experimentation seems to be the key factor in getting to know this area of expression along with taking inspiration and advice from those who have mastered the technique. I now feel better equipped with knowledge to further my exploration into the abstract genre and remain greatly inspired by Friel and the results he has produced.


Following on from my own experimentation and continuing research, concentrating on intentional camera movement and producing satisfactory results with this technique, will be the key emphasis of my plan for unit 4.


Bibliography


Chinnery, D. (2013). Multiple Exposure Photography. On Landscape. 63 (September), p1-20. Last accessed 17th Feb 2014.


Davis, H. (2009). Creative Close-Ups: Digital Photography Tips and Techniques. 10th ed. Indianapolis: Wiley Publishing Inc. p46.


Guy, D. (2012). Definition: Abstract Photography. Available: http://www.photokonnexion.com/?s=definition+abstract+photography. Last accessed 14th Feb 2014. 


Humphries, J (2013). Close-Up and Macro Photography: Art and Techniques. Marlborough: Crowood Press Ltd. p7.

Jung, S. (2014). Stephanie Jung Photography. Available: http://portfolio122826.4ormat.com/japan. Last accessed 10th May 2014.


Parkin, T. (2010). Chris Friel - Featured Photographer. On Landscape. 5 (December), p4. Last accessed 17th Feb 2014.


Rossbach, J. (2011). The Art of Abstract Photography. Photographic Society of America, Inc. 77 (6), p26.


Roth, J. (2012). Mastering the Art of Intentional Camera Movement. Available: http://www.apogeephoto.com/sept2011/jroth92011.shtml. Last accessed 16th Mar 2014.


Stephens, H. A. (2012). Painting With Light: Intentional Camera Movement. Available: http://www.picturecorrect.com/tips/painting-with-light-intentional-camera-movement/. Last accessed 14th Mar 2013.